The Futurae Web Widget
The Futurae Web widget provides a fast and easy way to add strong and usable authentication for the users of your web application. Instead of having to integrate the Auth API and manually implement the necessary logic for on-boarding and authenticating users with Futurae, the widget handles all this for you, thereby significantly speeding up the integration process.
The widget is based on an iframe that can be integrated into your login page to enhance your login security with Futurae 2FA solutions. It supports a variety of authentication factors, including One-Touch (push notification-based), online QR code, offline QR code, passcode, and SMS. This allows your users to authenticate using various devices, such as mobile devices with an authenticator app installed, a mobile number, or hardware tokens.
Libraries are currently available for Python, Ruby, Go, PHP, Node.js, Java and .NET.
Overview
For the sake of consistency, the rest of the guide assumes that you are integrating Futurae as a second authentication factor, nevertheless this does not have to be the case.
Let us assume that you have a web application, in which your users are logging in using their username and password. Implementing Futurae Web as the second factor authentication into your site involves simply adding a second login page and splitting your login handler into two parts. The first part will be handling the first authentication step (username and password), while the second page will include the embedded Futurae widget which will handle the second authentication step via Futurae authentication.
After integrating Futurae Web, the login process will look like this:
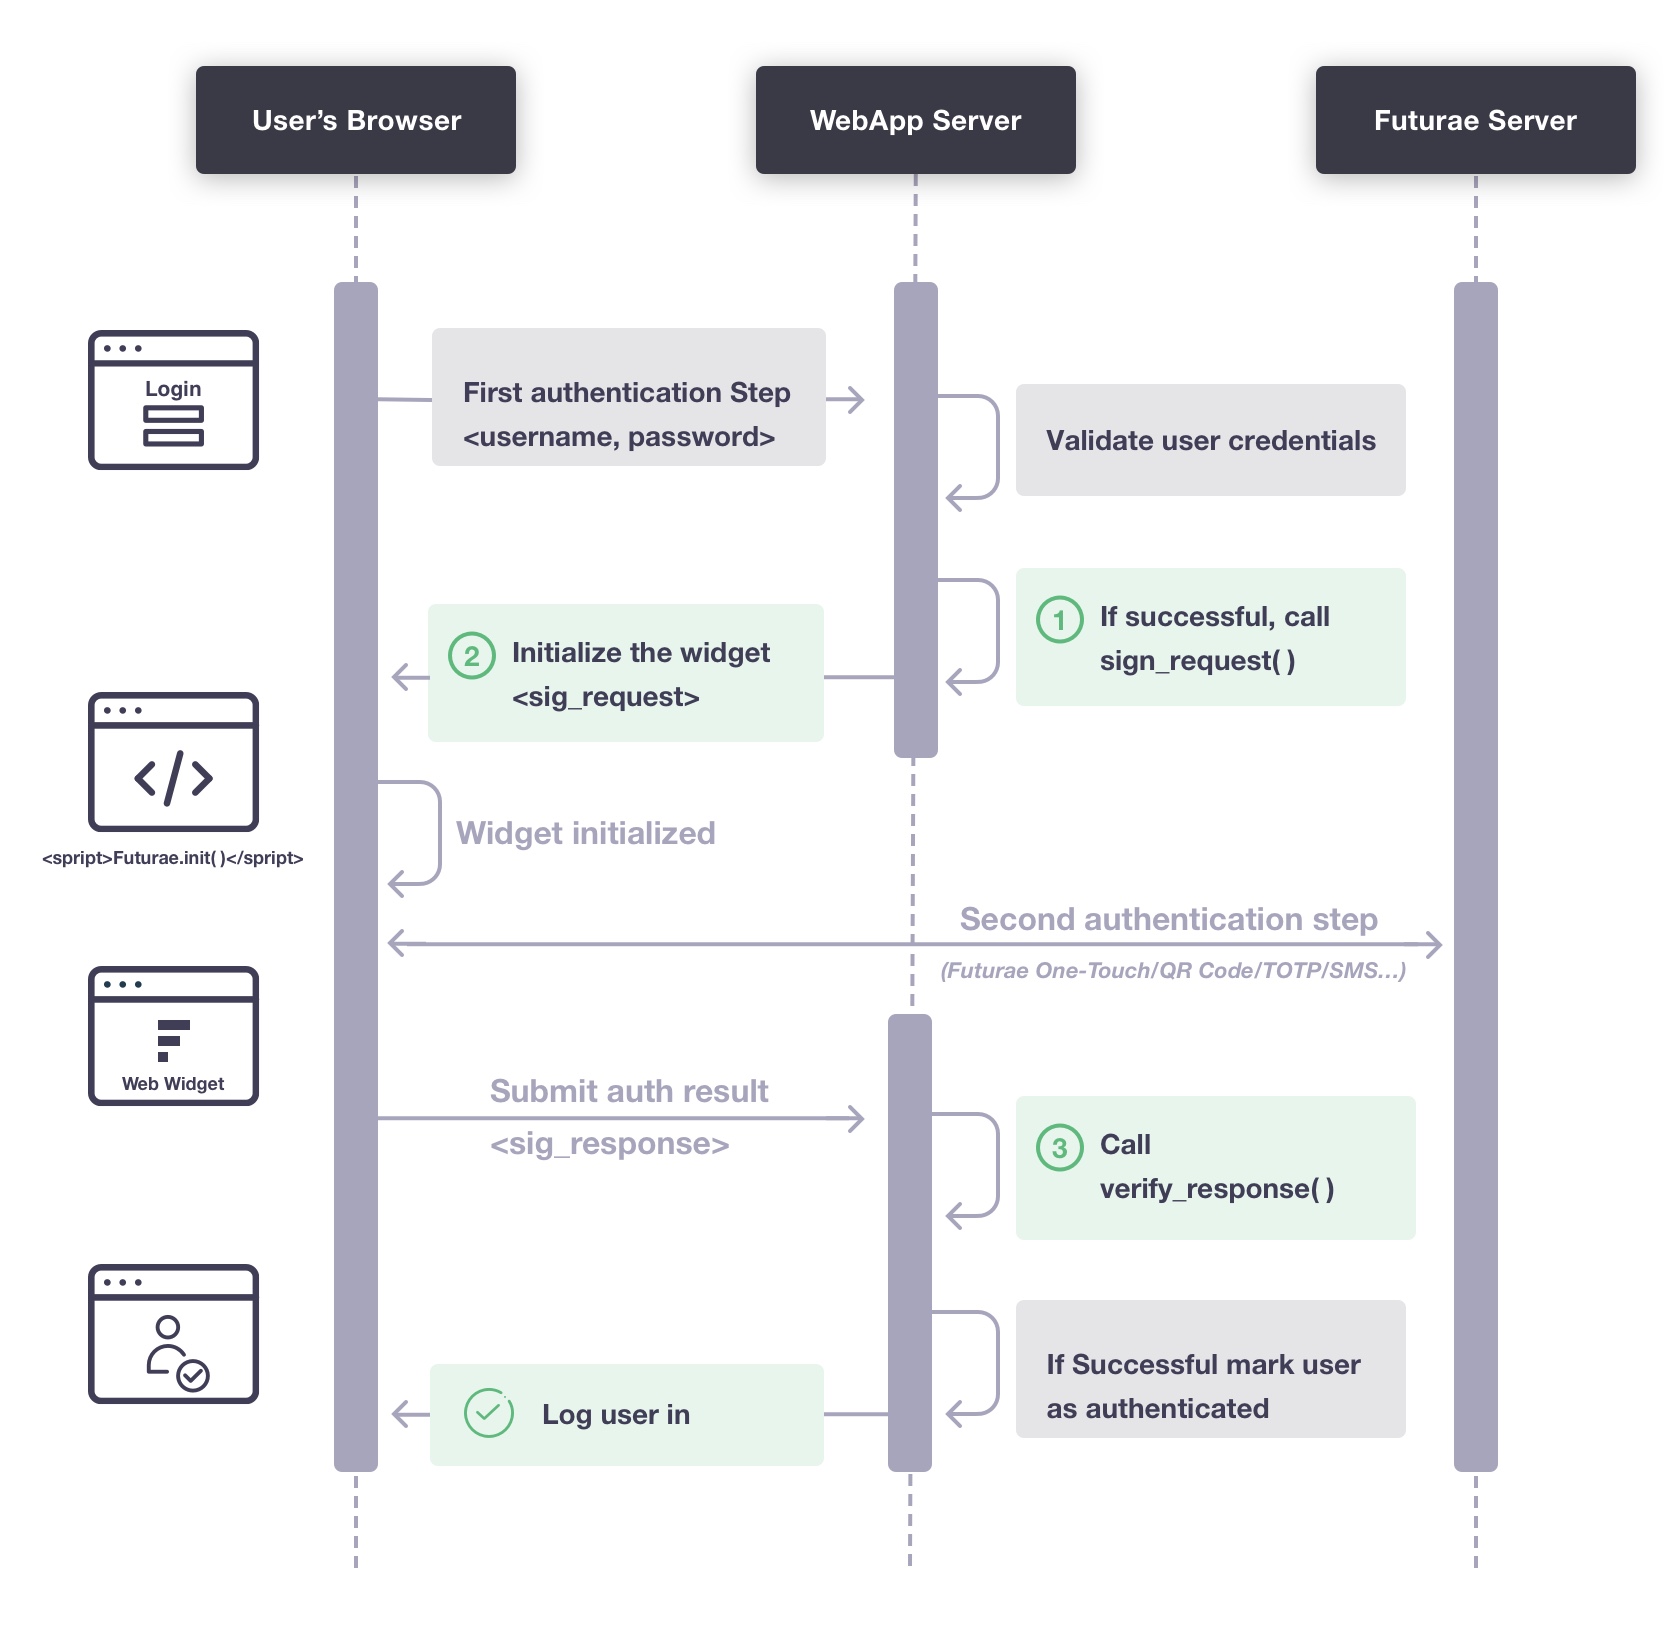
There are three step you need to perform, highlighted in green on the figure above:
- Call
sign_request() - Initialize the widget.
- Call
verify_response()
Prerequisites
In order to integrate Futurae Web, you will need the following:
- Familiarity with your web application’s programming language and authentication process.
- Download and include a supported library in your web application. We currently provide libraries for Python, Ruby, Go, PHP, Node.js, Java and .NET.
- Have access to your Futurae Web ID (
wid), Web Key (wkey) and API hostname. You can find all these values in your Futurae Admin account. - Use NTP to ensure that your server’s time is correct.
- Generate your Secret Key (
skey), as described below.
Generate your Secret Key
The Secret Key is a sufficiently long and random string that you create yourself and keep it secret from everyone, including Futurae.
In order to create your Secret Key, use a cryptographically secure random generator. For example, you can generate a cryptographically secure Secret Key (represented as a base64 string) in Python 2.7+ or 3 with:
import os, base64
print (base64.b64encode(os.urandom(33)).decode('utf-8'))
The resulting length of the Secret Key string must be at least 40.
Step-by-Step Instructions
1. Call sign_request()
After the first authentication step is completed successfully (e.g., the user submits a valid username and password), you need to call sign_request() in the web application backend which initializes the second authentication step using Futurae.
sign_request() takes the following arguments:
- Web ID (
wid) - Web Key (
wkey) - Secret Key (
skey) - The username of the user who just passed the first authentication step
Note that if users are allowed to change their usernames, you should use some other identifier that is guaranteed to never change.
For example, in Python:
sig_request = sign_request(wid, wkey, skey, username)
2. Initialize the widget
Your web application should now display a second page that will contain the Futurae widget which will handle the second authentication factor.
Then Futurae Web SDK consists of a JavaScript library which handles the initialization and communication between the widget, the user and your web application.
In the Web SDK repository you can find the JavaScript library file, as well as a minified version.
<script src="/path/to/self/hosted/Futurae-Web-SDK-v1.js"></script>
<script>
  Futurae.init({
    host: 'host',
    sig_request: sig_request_passed_from_server,
    post_action: 'post_URL_to_your_server'
  });
</script>
In this example, Futurae.init() takes the following options:
| Field | Description |
|---|---|
host | The Futurae API hostname (e.g., “api.futurae.com”) |
sig_request | The signed request generated by sign_request() |
post_action | The server-side URL to which the Futurae authentication results (the signed response) should be POSTed |
Refer to the full list of Futurae.init() arguments for more options (for example, to use a JS callback instead of a POST action, in order to prevent the page from reloading).
Then, you need to include an iframe on the page with id set to futurae_widget. This is where the Futurae authentication widget will appear.
Use CSS to set the iframe’s dimensions:
<iframe id="futurae_widget" frameborder="0">
</iframe>
<style>
  #futurae_widget {
    width: 800px;
    height: 501px;
    border: none;
  }
</style>
When this page loads, the JavaScript snippet will set up the widget, prompt the user for Futurae authentication, and POST back the results to your server.
3. Call verify_response()
After the user has successfully performed Futurae authentication the widget will POST (with content type application/x-www-form-urlencoded) a signed response, called sig_response, to the post_action URL. Your server-side code should then call verify_response() to verify the signed response.
As the signed response is an assertion that the user completed both primary and secondary authentication, ensure that it is transmitted securely as sensitive data.
verify_response() takes the following arguments:
- Web ID (
wid) - Web Key (
wkey) - Secret Key (
skey) - The signed response (
sig_response)
It will return the username of the authenticated user if the response is valid, or null (None in Python, Nil in Ruby, etc.) if the response is invalid.
For example, in Python:
authenticated_username = verify_response(wid, wkey, skey, sig_response)
if authenticated_username is not None:
  log_user_in(authenticated_username)
After ensuring that the username returned by verify_response() is not null, your application can set whatever identifier is necessary (e.g., cookie, session state, etc.) to indicate that the user has been successfully authenticated. If your application preserves state and you know the login username, you should verify that authenticated_username returned from verify_response() matches that username before proceeding.
Additional Information
Futurae.init() arguments
| Argument | Value | Required? | Default |
|---|---|---|---|
host | The Futurae API hostname (e.g., “api.futurae.com”) | Required | |
iframe | The id of the iframe element to initialize. | Optional | futurae_widget |
lang | The language of the displayed text in the widget. More information. | Optional | en |
sig_request | The signed request generated by sign_request(). | Required | |
post_action | The URL to POST the signed response to. | Optional | "" (i.e., post back to same page, like a form with an empty action) |
post_argument | The argument for signed response in post_action. | Optional | sig_response |
submit_callback | The submit callback provides an alternative way of retrieving the sig_response, without having the Futurae Web SDK to automatically POST it to your server. This is useful, for example, when you want to prevent the page from refreshing.This argument contains the JS callback to execute. If provided, the Futurae Web SDK will not execute a POST action, it will only call the specified callback. The callback will receive the futurae_form object as argument. One of its input fields will be the sig_response. | Optional |
Look and Behavior Customizations
The Futurae Web widget can be customized in a variety of ways. The available customization options will be available in your Futurae Admin account.
Multilingual Support
The Futurae Web widget offers multilingual support. The default language is English. Use the lang argument in Futurae.init() to choose a different language dynamically at runtime. Currently available languages are English (en, default), German (de), French (fr), Spanish (es) and Italian (it).
Using the Auth/Admin API with Futurae Web
You can use the Futurae Web widget in combination with the Futurae backend APIs in order to implement additional Futurae-related functionality in your application.
For example, you could use the Web widget in your application’s login flow for authenticating your users, and use the Auth API for protecting sensitive user actions with transaction authentication (which is currently not offered by the Web widget), as well as the Admin API to implement advanced Futurae user and device management in specific parts of your application (e.g., in the user settings).
As another example, you may wish to contact Futurae’s service before initializing the Futurae Web Widget. For example, you may want to verify that the Futurae service is available and responding before invoking the second authentication step handler. To accomplish this, you may utilize Futurae’s Auth API ping endpoint to implement a health check for the Futurae service.
Passing additional POST arguments with the signed response
Futurae’s JavaScript will pass additional arguments found in a futurae_form form with the signed response. For example:
<form method="POST" id="futurae_form">
 <input type="hidden" name="some_name" value="some_value" />
</form>
Note that while the signed response is protected from spoofing by its signature and expiration, you must provide any such protection for these additional arguments yourself.
Need help?
If you have have any questions, feel free to contact us at support@futurae.com.